
People traditionally make wreaths for a lot of celebrations. Wreaths symbolize the circle of life and we also use them to celebrate the different cycles of nature. Over the years, people also used wreaths for other decorative purposes not just for the holiday season. People hang wreaths on walls, doors, and also over mantel places. They are made up of a variety of different materials such as evergreens, straw, pinecones, fabric, ribbons, and even mesh! You can also use leftover Christmas ornaments or cranberries to make them! Keep reading to find out more about how to make festive and decorative wreath out of different materials.
How To Make a Wreath For Fall

Fall is a beautiful season and it also brings a lot of festivals that call for wreaths to decorate your home. If you are looking for ways to make wreaths this fall, you don’t have to look further. The things you will need to make this wreath are one garland and four picks with leaves. A pick is a bundle of greenery which makes the body of the wreath. You will also need three picks of pumpkin, squash, and cattail, and a hot glue gun. All these things can be bought for only seventy rupees each.
If you want you can also buy some extra springs, leaves, or flowers to add to the wreath according to your taste. Now we can get started on the actual process of making the wreath. First, you should take all the picks that you bought. Now you have to pluck the leaf stem from the picks very carefully. Do this slowly so that the leaves do not get damaged or torn. After you complete this step you will have just the leaves left from the picks. You can dispose of all the things that are leftovers such as plastics and leaf stems. These wreaths are really simple to make but they look very beautiful. This holiday season is the perfect time to bring out your creative skills.
How To Make a Wreath For Fall Step By Step
When you have all your loose leaves in front of you free from the plastic and stems, start separating them. Make piles of the leaves according to color. This will help you to figure out what pattern of color you want on your wreath. After this carefully use your hot glue gun to stick the leaves on the wreath frame. Hold the leaves in place for a few seconds to make sure they stick properly. You must remember to distribute the different colors of the leaves all over the wreath. The variety of colors of the leaves will give it it’s autumn touch! This process will be very time-consuming because you have to cover the frame completely with all the leaves.
How To Make a Wreath For Fall Cheaply
You have to make the wreath look full so don’t be stingy with the number of leaves you glue on the frame. The fuller it is the better it will look. If you run out of leaves, you can also cut the leaves off the garland and use them to fill the empty spots on the frame. After you are done with the process of gluing the leaves on the frame, it is time to decorate the wreath with the final accessories. Use the squash, the pumpkin, pine cones, berries, or whatever other decorative material you want. Start gluing these items onto the leaves. After you have stuck all the leftover materials on it, leave it out to dry for some time.
Thus, you are done with your cost-effective fall wreath! You can now hang it on your front door or on the porch or gift it to a friend! Thus, you can check out thrift stores for any decor leaves they may have leftover.
How To Make a Wreath with Mesh
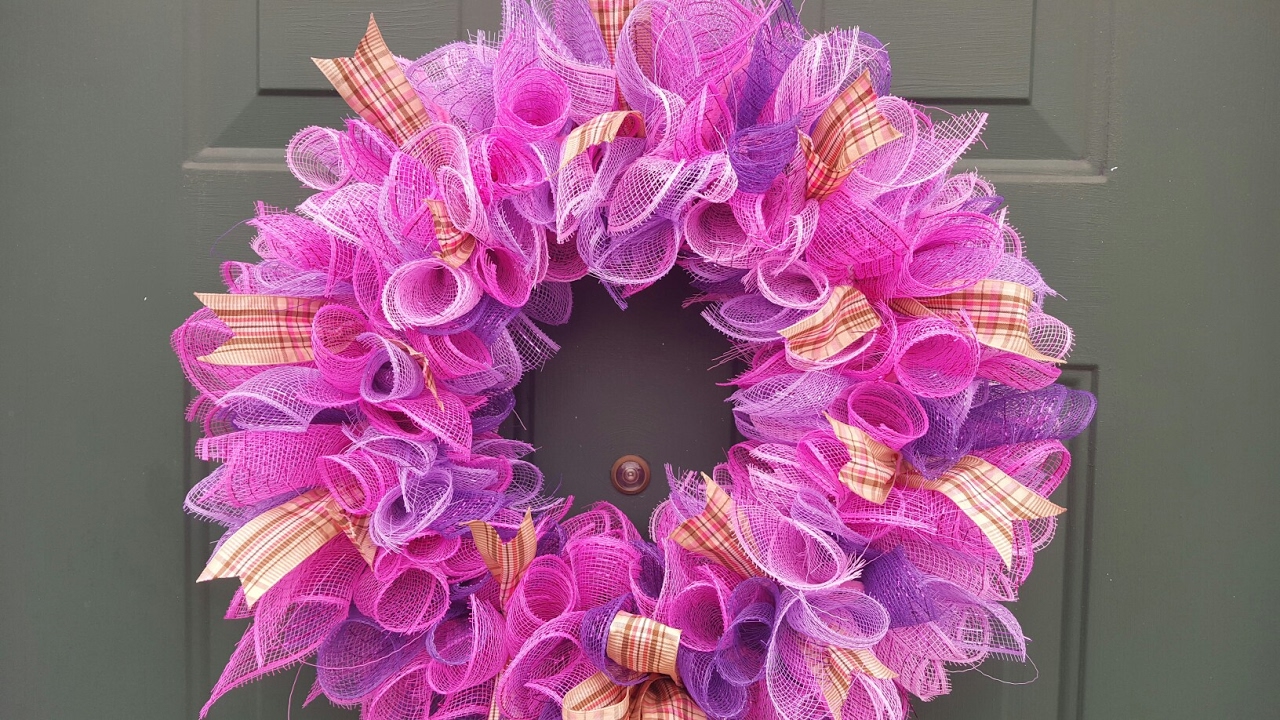
A great thing about wreaths is that you can make them with a lot of different materials! Mesh wreaths are very popular and they look really cool. To make a mesh one you will need a wreath base that is made out of a wireframe. You will also need a deco mesh, pipe cleaners, zip ties, a rotary cutter, and a wire cutter.
First, take out the deco mesh and start making flowers or whatever decorative pattern you want on the wreath. We will wrap this around the wireframe later. Fix the flowers and designs in place with the pipe cleaners and zip ties. When you need to cut the deco mesh use the rotary cutters. Next, you have to attach the mesh to the wire frame. You can do this by using the zip ties present in the tools list.
Use the zip tie and join the mesh to the wire wreath form on the side of the inner ring. You must remember to attach the mesh at a cross bar. After your design is ready you have to start wrapping it around the wreath wire frame. Tie it securely with the pipe liners and fold the ribbons of the deco mesh around the wire frame. You can decorate this ruffled mesh wreath in any way you want to.
How To Make a Wreath with Burlap

Burlap wreaths are a trend at this time of the year and they will make your home look hip and fashionable. Keep reading to know the steps of making your very own burlap wreath. The things you will need to make this burlap decoration are burlap ribbon rolls, zip ties, scissors, and wire cutters. You will also need a fourteen-inch wire wreath form. Thus, now we are ready to start making a beautiful ruffled wreath. Now you have to start pushing the burlap into the wire form. Push the burlap into the wire wreath form at each section. This should create a poof which will be about three inches in width.
You must remember to keep twisting the burlap as you push it in the rings of the form. Each section of the wire form has enough space for about three or four burlap poofs. You have to take care not to push too many poofs into a single section or they will flatten and look very bad. Keep making poofs till the whole wreath form is filled. You may use the burlap to make the poofs fuller than three inches if you want.
You can keep attaching the poofs in the sections of the wire form till it is full. Finally, you have to use scissors to cut off the burlap. After that tie the loose end of the burlap very securely with one of the zip ties. Thus, your burlap wreath is now ready. Fluff the poofs out so that the wreath looks nice and full. After fluffing the wreath you may even put a bow on it. You can now use this to hang on your front door, or even gift it to your neighbors.
How To Make a Wreath with Fabric
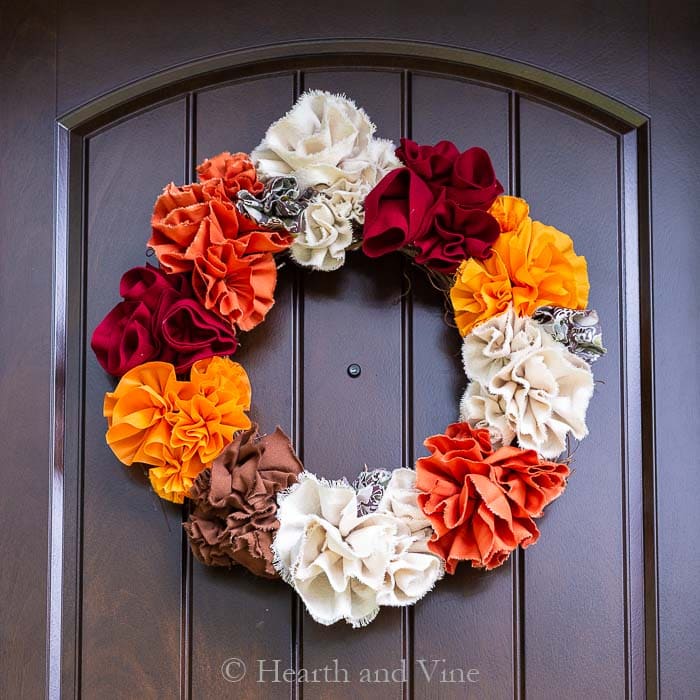
The best thing about fabric wreaths is that they are really cheap and easy to make. You can make this wreath absolutely free of cost because all the materials are usually available at home. It is a great way to make use of old fabrics in the house such as old curtains, skirts, bedsheets, or any other old clothes. They can be a really thoughtful handmade gift that everyone will appreciate. Fabric wreaths look better if you use one solid colored fabric to make them. Patterns will also look good, but we find that solid and neutral colors look more impressive.
The materials required to make a wreath are quite simple. You will need about three meters of fabric or just use old curtains. You will also need a fourteen-inch frame of wire, a rotary cutter or scissors, and a ruler.
The first step of making this fabric item is cutting the fabric. You have to cut all of the cloth you have into long strips. The dimensions of the strips are 1.5 inches in width and 9 inches in length. Use the rotary cutter or the scissors in the tool list to cut the fabric into the strips. You can use scissors to cut the fabric but a rotary cutter is really fast and easy to use.
Thus, we advise you to use a pair of rotary cutters and an acrylic ruler to cut the fabric. First, cut the fabric into 1.5-inch strips. Then cut these 1.5-inch strips into 9 inch long strips. Then you have to start tying the fabric into the wire wreath form. Make loops and flowers by tying the fabric in different ways. Finally secure the fabric with zip liners. Thus your DIY fabric wreath is ready!
How To Make a Wreath with Material
Wreaths made out of different materials such as tulle or net look really beautiful and you can hang them on your front door or porch. You can also make them with materials available at home to minimize production costs. These can also be a great thoughtful gift! To start off you will need a wire wreath form, scissors, zip liners, and any material, like cloth, tulle, net, satin, or velvet. We prefer using cloth or tulle because satin or other smooth slippery materials are very difficult to make into poofs. They also do not hold their form.
After you have all your materials you can start with the process of making these material wreaths. Tear or cut the material into long strips. This will help you to tie it around the wire form. Now since you have all your material strips ready you can start tying them around the wire frame. Fold the strips in half and then put them under the wire frame. Then open the end of the material with the loop and pull the other end through it. In this way, the material will form a knot on the wire frame. You must make sure to pull the knot tight so that it does not open and damage it later.
Next, you have to keep repeating this process. Fold the strips, and pull the looped end from underneath the wire. While doing this you must remember to keep pushing the strips of the material together. Thus, at the end of this process, you will have very little space in between the material. Hence it will look very full and nice. You have to continue looping the remaining material around the wire form till it is completely full. After the wreath is complete, turn it over.
How To Make a Wreath With Ribbon
When you are using ribbon or burlap, the wreath is known as a ribbon wreath. We would advise you to use red satin ribbon so that these wreaths can be used for Easter and valentine’s day. You can also use them for Christmas after adding a few green decorations! You must remember to use a ribbon that has a wire in it to make this wreath. This is because an ordinary bubble will just collapse and not stay in place.
Hence you must use a ribbon with a wire in it to keep the ribbon bubbles in place. It is a little difficult to start making this wreath because in the beginning the ribbon moves around a lot and it is hard to maintain the bubbles. But as you move along the process of making the wreath it will get easier. As you add more and more rows of loops, the ribbon will stay in place.
How To Make a Wreath With Tulle

Tulle wreaths are relatively simpler to make than mesh or any other kind of wreaths. They are simple but beautiful. You can gift this homemade tulle wreath to anyone as a housewarming gift or even as a Christmas or Easter gift. The best thing about these ribbon wreaths is that they are not only inexpensive and easy to make, they also take very little time to finish! Thus you can make a tulle wreath in less than a few minutes.
If you have experience making burlap wreaths, this process will not be difficult for you at all. This is because tulle and burlap wreaths are made using almost the same technique. However, if you have not made a burlap wreath before do not worry, it is very simple to learn as well. Just follow the steps of making a burlap wreath using tulle instead of burlap and you will be able to make a tulle wreath.
How To Make a Wreath For Front Door
Wreaths look really beautiful on your front door! Use a wire wreath frame and material such as net, mesh, or fabric to make the bubble-like pattern on it. Tie it securely with a pipe cleaner or just glue the loose ends together. Thus you can use simple home materials to make a beautiful decoration for your front door.
Use a bow maker to make a bow or you can also use any other decorative materials on your mesh wreath to make it look nice! This process is thus relatively simple and you can decorate your home with this beautiful wire and mesh wreath. You can use a lot of things to hang this wreath. You can use twine, ribbon or even use old necklaces. Match whatever material you have at home with the wreath to create a funky look!