Plumber’s Putty to a Sink Drain: Occasionally, homeowners encounter issues that may not be common knowledge to resolve, which is completely understandable. At One Source Home Service in Colorado Springs, CO, we take pleasure in educating people about various home repairs that may be necessary from time to time. In this article, we’ll provide a step-by-step guide on applying a plumber’s putty to a sink drain. Spoiler alert: it’s easier than you might imagine.
When Do You Need Plumber’s Putty?
Plumber’s putty is frequently used to address minor leaks in bathroom and kitchen drains, as well as other plumbing pipes. However, it’s usually a temporary fix, and eventually, the fixture or piping will need replacement. In this article, we’ll outline the process of applying putty, including the tools typically required. Remember, you don’t have to tackle this task alone; enlist a friend’s help or hire a plumber in Colorado Springs!
Tools Required:
- Pipe Wrench
- Bucket
- Putty Knife
- Cloth
- Rag
Turn Off the Water
First, shut off the water supply by closing the valves beneath the sink or by turning off the main water supply for the entire house. This step helps avoid accidental water sprays, messes, and potential damage.
Disassemble the Drain Pipe
Place a bucket under the P-trap and start disassembling the drain pipe. Use your pipe wrench to loosen the nuts connecting the pipes to the drain and the strainer pipe at the sink’s base. Allow debris and excess water to drain into the bucket.
If you think your drain is more complex than a standard setup, consider calling a plumber in Colorado Springs. A professional can ensure the job is done correctly.
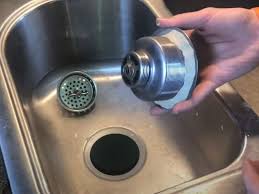
Remove the Pipe Base from the Sink
After loosening all connections, remove the pipe base from the sink. Clear away any debris and dry the area thoroughly. For the putty to adhere properly, the surface must be dry.
For commercial drain pipes, it’s advisable to hire a commercial plumber in Colorado Springs to address the issue.
Warm a Piece of Putty Between Your Hands
Take a section of putty from its container and rub it between your hands to warm it and make it more moldable. The texture will be similar to the dough, and it will become more pliable as you continue to work it between your hands.
Shape Putty into a 1/8″-1/4″ Thick Rope
Once the putty is pliable, form it into a rope with a thickness of 1/8 to 1/4 inches, depending on the leak’s size. The length should be sufficient to wrap around the pipe comfortably.
If your leak is too large for the putty to fix or you’re reapplying it repeatedly, it may be time to consult a plumber in Colorado Springs.
Position Putty in the Desired Area
With the rope formed, place it in the appropriate location, typically at pipe junctions where leaks occur. This helps seal the gap and prevent further water damage.
Reinstall the Pipe
With the putty securely in place, reinstall the pipe, ensuring the seal forms as the pipe reconnects to the basin or another pipe. Press around the flange or sink strainer for a tight fit.
Smooth & Dry the Surface
After reinstalling the pipe, smooth the putty at the seam for an even, secure seal. Dry the surrounding area with a towel or rag, and your sink is ready for use again.
Understanding Plumber’s Putty Dry Time
Plumber’s putty is a unique material. While effective for sealing leaks, it doesn’t dry like cement and remains soft. Don’t be alarmed by the lack of dryness if it’s your first time using putty. For more insights on putty and its uses in repairs, check out our recent blog post on the topic. Read Also: Does Plumber’s Putty Harden?
FAQS On Plumber’s Putty to a Sink Drain
What is the plumber’s putty used for in sink drains?
Plumber’s putty serves to establish a watertight barrier between the sink and drain flange, effectively stopping water from seeping into the cabinet underneath.
Can I use a plumber’s putty on plastic drains?
Yes, a plumber’s putty is safe to use on plastic drains, but always check the manufacturer’s recommendations to ensure compatibility.
Can I use silicone instead of a plumber’s putty for sink drains?
Silicone can be used as an alternative to a plumber’s putty. However, silicone dries to a hard finish, making it more difficult to remove compared to the pliable nature of a plumber’s putty.
How much plumber’s putty should I use for a sink drain?
Use enough putty to form a rope with a thickness of 1/8 to 1/4 inches that can wrap around the base of the sink drain flange.
Do I need to let the plumber’s putty dry before using the sink?
No, the plumber’s putty doesn’t dry completely and remains pliable. You can use the sink immediately after applying the putty.
How do I remove an old plumber’s putty from a sink drain?
Use a putty knife or a similar tool to carefully scrape away the old putty without damaging the sink surface.
Can a plumber’s putty be used on all types of sink materials?
Plumber’s putty is suitable for most sink materials, including stainless steel, porcelain, and acrylic. However, always check the manufacturer’s recommendations for compatibility.
How long does a plumber’s putty last on a sink drain?
Plumber’s putty can last for several years, but its lifespan may vary depending on factors such as water quality, frequency of use, and maintenance.
Can I use a plumber’s putty to fix a leak in a sink drainpipe?
Plumber’s putty is not designed for use on pipes; it’s best used for sealing the flange around the sink drain. For pipe leaks, consider using pipe repair products or consulting a plumber.
Is the plumber’s putty safe for contact with potable water?
Yes, a plumber’s putty is non-toxic and safe for contact with potable water. However, it’s essential to choose a putty specifically designed for use in plumbing applications.